
7. Inference for Means#
Textbook reference
This chapter corresponds to Chapter 7 of Introduction to the Practice of Statistics (Moore, McCabe & Craig, 10th ed.). Note that the course chapter numbers (shown in the sidebar) follow our teaching order, which differs from the textbook order.
Learning objectives
After this chapter, you will be able to:
Explain why replacing the unknown \(\sigma\) with the sample estimate \(s\) turns the \(z\) statistic into the \(t\) statistic, and describe the \(t\) distribution and its degrees of freedom.
Carry out one-sample \(t\) confidence intervals and significance tests, including for matched pairs data analyzed through within-pair differences.
Compare two population means with the two-sample \(t\) procedures, and explain when the pooled version is (and is not) appropriate.
State the robustness guidelines for \(t\) procedures and the options available when data are clearly non-Normal.
Plan a study: choose a sample size to meet a target margin of error, and list the factors that drive power.
Explain why “not statistically significant” does not mean “equal,” and how equivalence testing addresses that question properly.
Given a study description, decide which \(t\) procedure applies and why (how many samples, and are the observations linked?).
Key concepts at a glance
The \(t\) distribution and one-sample \(t\) · Matched pairs · Equivalence testing · Robustness · Comparing two means · Sample size and power · Putting it all together · Properties of \(s^2\)
Where are we? A question before we start
Every \(z\) formula so far assumed we know \(\sigma\). Be honest: when have you ever known a population’s standard deviation while not knowing its mean? If you already knew everything about the spread of all Purdue heights, you would almost surely know their average too. In practice we know neither — so we must estimate \(\sigma\) from the same small sample we use to estimate \(\mu\). Replacing \(\sigma\) with \(s\) costs something, and a Guinness brewery chemist named William Gosset — publishing under the pen name “Student” because the brewery would not let employees publish — worked out exactly what it costs. His answer, the \(t\) distribution, is what this chapter is about.
In the last chapter, we encountered the population parameter \(\sigma\) when calculating the margin of error for confidence intervals and computing the \(z\) test statistic for hypothesis testing. However, in practice, this \(\sigma\) is usually unknown.
Addressing the Unknown \(\sigma\):
In this chapter, we address this issue by making a more realistic assumption-that we do not know the value of \(\sigma\)-and explore how we can still conduct inference under two key settings:
Single-Sample Inference:
We have one sample and are interested in estimating the population mean \(\mu\).
This scenario mirrors what we saw in the previous chapter but now incorporates the unknown \(\sigma\).
Two-Sample Inference:
We have two independent samples, meaning we are dealing with two populations.
Our goal is to analyze the difference between the two population means, denoted as \(\mu_1 - \mu_2\).
Real-World Applications:
Many real-world problems fit into one of these two frameworks. Whether comparing before-and-after treatment effects, different experimental conditions, or population differences, these two settings provide a foundation for statistical inference when the population standard deviation \(\sigma\) is unknown.
7.1. Inference for the Mean of a Population#
A question before this section
The fix seems obvious: you don’t know \(\sigma\), so plug in \(s\) and keep using the \(z\) table. But notice what changed. \(\sigma\) is a fixed number; \(s\) is computed from your data and varies from sample to sample — with \(n = 16\) heights, it can easily come out too small just by luck. Divide by a too-small \(s\) and your statistic comes out too large more often than the Normal curve predicts. Should the substitution really be free? It isn’t — and the \(t\) distribution’s thicker tails are precisely the bill.
If we do not know the population standard deviation \(\sigma\), we need to find an estimator to approximate it-just as we use the sample mean \(\bar{x}\) to estimate the population mean \(\mu\). Naturally, a reasonable choice is the sample standard deviation \(s\) as an estimator for the population standard deviation \(\sigma\).
Why Use \(s\) Instead of \(\sigma\)?
The sample standard deviation \(s\) is a good estimator of the population counterpart \(\sigma\).
We can show that \(s^2\) is an unbiased estimator of \(\sigma^2\), meaning its expected value equals \(\sigma^2\). (The sample standard deviation \(s\) itself is slightly biased-it tends to underestimate \(\sigma\)-but the bias is small.)
\(s\) is also a consistent estimator, meaning that as the sample size \(n\) increases, \(s\) gets closer to \(\sigma\).
Standard Error:
Since we do not know \(\sigma\), we also need to estimate the standard deviation of the sample mean, which is:
\[\frac{\sigma}{\sqrt{n}}.\]By replacing \(\sigma\) with its estimator \(s\), we obtain the standard error (SE) of our sample mean \(\bar{x}\):
\[\text{SE}_{\bar{x}} = \frac{s}{\sqrt{n}}.\]
The standard error quantifies the expected variability of the sample mean \(\bar{x}\) across different samples and plays a crucial role in confidence intervals and hypothesis testing.
1. Standard Error of the Sample Mean
We have a sample of size \(n\) from a normally distributed population with true mean \(\mu\) and standard deviation \(\sigma\).
The sample mean \(\bar{x}\) has population standard deviation \(\frac{\sigma}{\sqrt{n}}\).
Unknown \(\sigma\): If \(\sigma\) is not known, we estimate it with the sample standard deviation \(s\).
Therefore, the estimated standard deviation of \(\bar{x}\) is: \(\text{SE}_{\bar{x}} = \frac{s}{\sqrt{n}}\).
This quantity is called the standard error of the sample mean. It represents an estimate of how much \(\bar{x}\) varies from sample to sample.
2. \(z\) vs. \(t\) Statistics
When \(\sigma\) is known, we can use the one-sample \(z\) statistic:
\[z = \frac{\bar{x} - \mu}{\sigma / \sqrt{n}}\]which follows a standard normal distribution \(N(0,1)\).
However, when \(\sigma\) is not known and is replaced by \(s\), the statistic
\[t = \frac{\bar{x} - \mu}{s / \sqrt{n}}\]does not follow a standard normal distribution. Instead, it follows a \(t\)-distribution with \(n - 1\) degrees of freedom.
3. The \(t\)-Distribution
The \(t\)-distribution arises naturally when we estimate \(\sigma\) by \(s\).
It looks similar to the standard normal distribution but has thicker tails, especially for smaller sample sizes.
As \(n \rightarrow \infty\), the \(t\)-distribution converges to the standard normal.
In practice, the \(t\)-distribution allows us to perform inference on the mean when the population standard deviation \(\sigma\) is unknown, using \(s\) as an estimator.
Why \(n - 1\) degrees of freedom? The case of two heights
Measure just \(n = 2\) heights: 66 and 70 inches. Their mean is \(\bar{x} = 68\), and the deviations from the mean are \(-2\) and \(+2\). Now notice: once you know the first deviation is \(-2\), the second is forced to be \(+2\) — deviations from \(\bar{x}\) must always sum to zero. Two deviations, but only one of them is free.
In general, the \(n\) deviations \(x_i - \bar{x}\) satisfy one constraint (\(\sum_{i=1}^n (x_i - \bar{x}) = 0\)), because \(\bar{x}\) was computed from the same data. So only \(n - 1\) deviations carry independent information — that is the “degrees of freedom” of \(s\), and it is why the \(t\) statistic based on \(s\) follows \(t(n-1)\), not \(t(n)\). (It is also why \(s^2\) divides by \(n - 1\) rather than \(n\); see the appendix for the proof that this makes \(s^2\) unbiased.)
Example: a one-sample \(t\) test on heights, start to finish
Suppose the national average height for college-age adults is claimed to be 68 inches, and you wonder whether Purdue students differ. You take an SRS of \(n = 16\) students and find \(\bar{x} = 67.1\) inches, \(s = 3.8\) inches.
Hypotheses: \(H_0: \mu = 68\) vs. \(H_a: \mu \neq 68\).
Test statistic: the standard error is \(\text{SE}_{\bar{x}} = 3.8/\sqrt{16} = 0.95\), so
\(p\)-value: software gives \(p = 2\,P(T_{15} \le -0.947) \approx 0.358\).
Conclusion: \(p = 0.358\) is far above any common \(\alpha\) — the data are entirely consistent with \(\mu = 68\). The 95% confidence interval, \(67.1 \pm 2.131 \times 0.95 = (65.1,\ 69.1)\) inches, tells the same story: 68 sits comfortably inside.
Where the “cost” shows up: if we had (wrongly) treated \(s = 3.8\) as the known \(\sigma\) and used the Normal table, we would report \(p \approx 0.343\) — slightly smaller. And the \(z\) critical value \(1.960\) is smaller than \(t^*_{15} = 2.131\), so the \(z\) interval would be narrower than it should be. The thicker tails of \(t(15)\) are Gosset’s honest accounting for the extra uncertainty in \(s\).
Common misunderstanding
Students often think: “Use \(t\) when \(n\) is small, and switch to \(z\) once \(n \geq 30\).”
In fact: the choice between \(z\) and \(t\) is driven by whether \(\sigma\) is known, not by the sample size. Since \(\sigma\) is essentially never known in practice, you use \(t\) whenever you estimate it with \(s\) — at any \(n\). This is harmless for large samples because \(t(n-1)\) converges to \(N(0,1)\): the folklore survives only because the error from using \(z\) shrinks as \(n\) grows. But the principled rule is simple: estimated \(\sigma\) \(\Rightarrow\) \(t\).
Quick check: you measure \(n = 400\) heights and compute \(s\) from the data. \(z\) or \(t\)? (\(t\) with 399 degrees of freedom. Numerically it barely matters — \(t^*_{399} = 1.966\) vs. \(z^* = 1.960\) for 95% confidence — but the reason to use \(z\) would be a known \(\sigma\), and you don’t have one.)
A question before this section
Your morning height and your evening height differ — people shrink about a centimeter during the day as the discs in the spine compress. Suppose you want to detect this small effect. Would you compare 30 morning-people against 30 different evening-people, or measure the same 30 people twice — once at 8 am, once at 8 pm? Think about what varies in each plan: in the first, the 1 cm signal must fight through person-to-person height differences of several inches; in the second, each person is compared only with themselves. That second plan is the matched pairs design, and the payoff for analyzing it correctly is enormous.
Another setting where the one-sample t procedure is often used is in a matched-pairs design.
In a matched-pairs setup:
Each pair of observations is combined into a single difference value, yielding a single set of differences (one per pair).
Because these differences form one sample, the standard one-sample t test applies naturally to determine whether the average difference is zero.
The logic of a one-sample test remains the same-now we simply use within-pair differences rather than two separate sets of measurements.
Scenario
Study Goal: Compare measurements of machine parts with and without a certain “option” enabled in the measuring software.
Data: Each part gives two measurements: Option On and Option Off. The difference \(d_i = (\text{Off}_i - \text{On}_i)\) is recorded for each part \(i\).
Sample Size: \(n = 51\) parts, so we have 51 paired differences \(d_1, d_2, \dots, d_{51}\) (the table below shows the first 20 of the 51 parts).
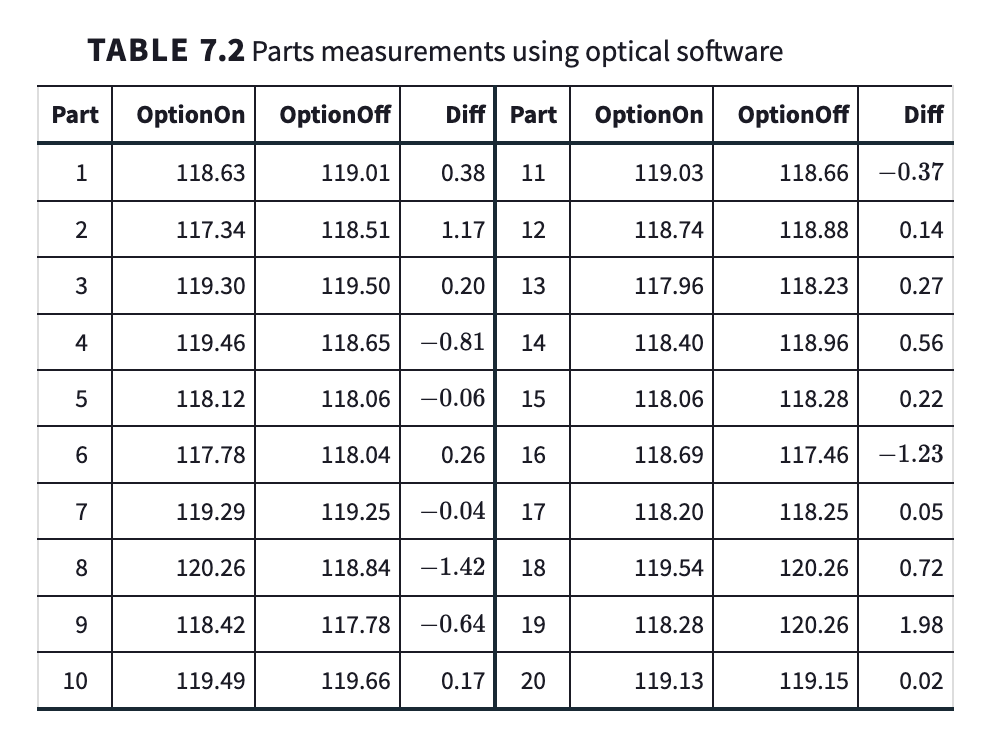
How to read this figure (a paired-data table)
This table is the matched-pairs design, laid out row by row:
Each row is one part — one pair. The two measurements in a row belong to the same physical part, measured twice (option on, option off). That within-row link is what makes the data “paired.”
The two measurement columns (Option On, Option Off) vary a lot from row to row — the parts themselves differ in size. That part-to-part variation is real, but it is not what we are studying.
The difference column (\(d_i = \text{Off}_i - \text{On}_i\)) is where the analysis lives. Notice the differences are tiny compared with the measurements themselves, and they carry both signs, scattering around zero — a first visual hint that the option may make no systematic difference.
After subtracting, the original columns are discarded. The one-sample \(t\) procedure sees only the 51 differences: one number per pair, \(n = 51\), \(df = 50\). Subtracting within each row cancels the part-to-part variation entirely, which is exactly the point of pairing.
When you meet any paired table: first identify what links the two measurements in a row, then form the differences, then treat those differences as an ordinary one-sample problem.
Hypotheses
We test:
where \(\mu\) is the population mean of the difference in measurements (Off minus On).
Key Summary Statistics
\(\bar{d} = 0.0504\) (mean of the 51 differences)
\(s = 0.6943\) (sample standard deviation of the differences)
One-Sample \(t\) Statistic
This statistic follows a \(t\) distribution with \(n - 1 = 50\) degrees of freedom under \(H_0\).
Interpretation of Results
\(t = 0.52\), \(df = 50\).
The p-value (two-tailed) is greater than 0.50 (software reports approximately 0.61).
Conclusion: There is no statistically significant evidence (\(p \approx 0.61\)) to conclude that the measuring option changes the average measurement.
When reporting results, it is common to say:
“The difference in measurements was not statistically significant (\(t = 0.52\), \(df = 50\), \(p = 0.61\)).”
Example: do you shrink during the day? (the morning/evening heights, carried through)
Let’s answer the bridge question with numbers. Measure the same \(n = 30\) students at 8 am and again at 8 pm, and form one difference per person: \(d_i = \text{morning}_i - \text{evening}_i\) (in cm). Suppose the data give \(\bar{d} = 0.95\) cm and \(s_d = 0.52\) cm.
Hypotheses: \(H_0: \mu_d = 0\) vs. \(H_a: \mu_d > 0\) (one-sided, pre-specified: disc compression predicts shrinkage, not growth).
Test statistic:
\(p\)-value: \(P(T_{29} \ge 10.0) \approx 3 \times 10^{-11}\) — overwhelming evidence. The 95% confidence interval for the mean shrinkage is \(0.95 \pm 2.045 \times 0.0949 = (0.76,\ 1.14)\) cm.
Why pairing won: now try the other design from the bridge — 30 morning-people vs. 30 different evening-people, analyzed as two independent samples. Heights vary from person to person with \(s \approx 7\) cm, so the standard error becomes \(\sqrt{7^2/30 + 7^2/30} \approx 1.81\) cm and the same 0.95 cm signal gives \(t \approx 0.53\) — completely undetectable. Pairing subtracted away the person-to-person variation and shrank the standard error from about \(1.81\) to \(0.095\): the same effect went from invisible to unmistakable.
Common misunderstanding
Students often think: “Matched pairs is just a two-sample problem that happens to have \(n_1 = n_2\).”
In fact: pairing changes the analysis, not just the bookkeeping. Paired data become one sample of within-pair differences, analyzed with a one-sample \(t\) on \(n - 1\) degrees of freedom (\(n\) = number of pairs). The two-sample formula assumes the samples are independent — but two measurements on the same person (or part) are strongly correlated, and treating them as independent throws away exactly the advantage the design bought. Analyze the design you ran.
Quick check: in the shrinkage study, the paired analysis gave \(t \approx 10.0\); the same numbers wrongly run through the two-sample formula gave \(t \approx 0.53\). Which analysis matches how the data were actually collected? (The paired one — each row of data came from a single person measured twice.)
Caution
A Lack of Statistical Significance \(\neq\) Proof of \(H_0\)
Failing to reject \(H_0\) does not mean we have proven \(H_0\) true; it often means that our study lacked sufficient evidence (or power) to show a difference.
If we could “prove” a null hypothesis by simply getting a non-significant result, we could always design weak experiments to achieve that outcome. Clearly, this is not sound science.
Here, we can shift our question slightly to:
“Is any difference too small to be important?”
By pre-specifying an acceptable difference \(\delta\), we conduct Equivalence Testing, which focuses on practical rather than purely statistical significance.
Why Standard Hypothesis Testing Is Not Enough:
A nonsignificant result in a standard hypothesis test does not necessarily mean two groups are equivalent.
Instead of simply failing to reject \(H_0\), we need to demonstrate with high confidence that the difference is within an agreed-upon small range.
The traditional “test vs. zero” framework does not establish equivalence-it only tests for a lack of sufficient evidence to reject \(H_0\).
Equivalence Testing Logic:
We define a small “practical” difference (threshold) \(\delta\) below which two means are deemed “close enough” to be considered equivalent.
We then ask if our data strongly indicate that any true difference cannot exceed \(\delta\) in magnitude.
Concretely, we build a confidence interval around our estimated difference.
If the entire CI fits within \((-\delta,\ \delta)\), we declare the two means “equivalent.”
If part of the CI lies outside \((-\delta,\ \delta)\), we lack evidence to conclude equivalence.
Motivation: Sometimes we want to show that two treatments or measurements are practically the same (i.e., any difference is too small to matter). A traditional hypothesis test merely tells us whether a difference is detectable, not whether it is small.
Approach:
Specify an equivalence range around the null value, say \(\mu_0 \pm \delta\). Any difference within \(\pm \delta\) is deemed “unimportant.”
Construct a confidence interval (CI) for the parameter of interest (often a mean difference). For an equivalence conclusion at significance level \(\alpha\), use a \(1 - 2\alpha\) confidence interval (e.g., a 90% CI for a 5%-level test).
If the entire CI lies inside \(\mu_0 \pm \delta\), we conclude equivalence. Otherwise, we lack evidence to declare them equivalent.
Key Point: Equivalence testing focuses on whether the true mean difference is small enough to be negligible, rather than simply testing if it differs from zero.
Scenario: Researchers consider a mean difference less than 0.20 micron “not important.”
Data: We have a sample of size \(n=51\), yielding \(\bar{d} = 0.0504\), and \(\text{SE}_{\bar{d}}=0.0972\).
90% CI: \(\bar{d} \pm t^*\,\text{SE}_{\bar{d}} = 0.0504 \pm (1.676)(0.0972) = (-0.113,\ 0.213).\)
Note that Minitab labels this interval a “95% CI for Equivalence” because it follows the one-sided-\(\alpha\) labeling convention; the interval shown is numerically the 90% two-sided CI used by the 5%-level equivalence (TOST) procedure. The interval is not entirely contained in the “equivalence region” \([-0.20,\ 0.20]\) because the upper endpoint \(0.213\) exceeds the upper equivalence limit \(0.20\), so we cannot conclude equivalence at the 5% significance level. However, the mean difference is quite close to zero, so a larger sample might shrink the CI and yield a different conclusion.
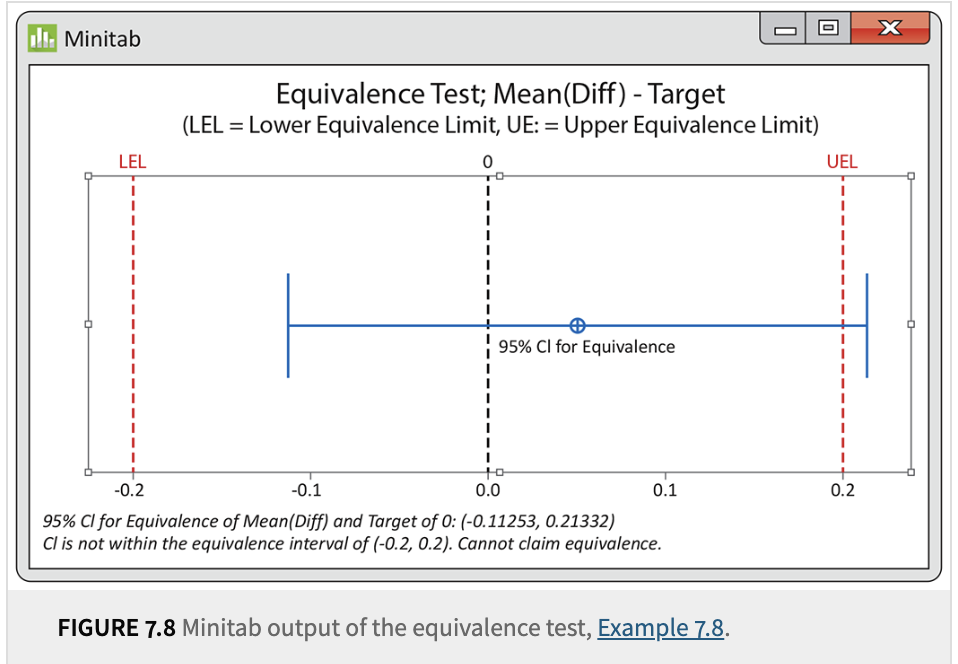
How to read this figure (Minitab equivalence output)
Read the plot in this order:
Find the equivalence zone. The two vertical reference lines mark the lower equivalence limit (LEL \(= -0.20\)) and upper equivalence limit (UEL \(= 0.20\)) — the researcher-chosen \(\pm\delta\) inside which a difference is “too small to matter.” These limits were fixed before looking at the data.
Find the interval. The horizontal bar is the confidence interval for the mean difference, \((-0.113,\ 0.213)\). Note the label says “95% CI for equivalence”: by the one-sided-\(\alpha\) convention of the TOST procedure, this is numerically the 90% two-sided interval used for a 5%-level equivalence test.
Apply the containment rule. Equivalence is declared only if the entire bar sits strictly between the two vertical lines. Here the right end of the bar (\(0.213\)) pokes past the UEL (\(0.20\)) — so Minitab prints “cannot claim equivalence.”
Notice how close the call is. The bar barely crosses the line. The point estimate (\(0.0504\)) is near zero; a somewhat larger sample would shrink the bar and could pull its right end inside the zone. “Cannot claim equivalence” — like “fail to reject” — is a statement about evidence, not a verdict that the two settings differ.
Common misunderstanding
Students often think: “Our test gave \(p = 0.61\) — we failed to reject \(H_0\), so we’ve shown the two settings are equivalent.”
In fact: failing to reject \(H_0\) is absence of evidence of a difference, not evidence of absence. A tiny or noisy study almost always fails to reject — that proves nothing about equivalence. Demonstrating equivalence requires its own procedure: pre-specify the largest unimportant difference \(\delta\), then show the entire \(1 - 2\alpha\) confidence interval fits inside \((-\delta,\ \delta)\) — the TOST logic. That is exactly why equivalence testing exists. Example 7.8 makes the point sharply: the very same data that gave \(p \approx 0.61\) against \(H_0: \mu = 0\) fail the stricter equivalence standard, because the CI pokes past \(\delta = 0.20\).
Quick check: a lab compares two instruments with only \(n = 3\) paired measurements and gets \(p = 0.70\). Have they demonstrated the instruments are interchangeable? (No — with \(n = 3\) the confidence interval is enormous; it will not fit inside any reasonable \((-\delta, \delta)\), and the large \(p\)-value reflects low power, not agreement.)
A question before this section
All of this — one-sample \(t\), matched pairs, the equivalence procedure — assumed the population is Normal. Real data rarely oblige: incomes are skewed, reaction times have outliers, and nobody hands you a certificate that heights are exactly Gaussian. How much does the Normality assumption actually matter? The happy answer: much less than you might fear, and predictably less as \(n\) grows. The guidelines below tell you when to trust \(t\), and what to reach for when you shouldn’t.
Finally, we should discuss the robustness of t procedures and possible alternatives, especially when dealing with non-normal datasets.
Central Limit Theorem: For large samples, the distribution of the sample mean \(\bar{x}\) is approximately Normal, regardless of the population distribution.
Law of Large Numbers: As \(n\) grows, the sample standard deviation \(s\) becomes a reliable estimate of the true \(\sigma\), making t tests generally reliable even if the population is not perfectly Normal.
Sample size < 15: Use t procedures only if the data are reasonably close to Normal (no strong skew/outliers).
\(15 \le n < 40\): t procedures are typically fine unless you see strong skew or obvious outliers.
\(n \ge 40\): Even clearly skewed data can often be handled with t procedures.
These are rules of thumb for a single mean. The main concern is the presence of serious non-Normality or outliers in small samples.
3. Inference for Non-Normal Populations
When data are clearly non-Normal and \(n\) is not large enough to rely on the robustness of t tests, you have several options:
Use a Different Parametric Model
Some distributions (e.g., Poisson, exponential, etc.) have specialized methods if you can justify them.
Transform the Data
Skewness often improves under a transformation like \(\log(x)\).
Then apply the t procedure to the transformed values. Results are more accurate if the transformed data are closer to Normal.
Con: Interpreting confidence intervals in the original scale can be trickier.
Distribution-Free (Nonparametric) Procedures
These methods do not assume the population follows a Normal distribution.
Pro: More general.
Con: Often less powerful if the data were in fact close to Normal. Also, many such methods focus on the median rather than the mean.
7.2. Comparing Two Means#
A question before this section
Matched pairs was the star of the last section — but what if the two groups can’t be the same people? Suppose you want to compare the average height of students at two different colleges. No student attends both; there is no natural way to link a student at one college with a student at the other. Now you genuinely have two independent samples from two populations, and you need a procedure built for that: the two-sample \(t\). The key question of this chapter — are the observations linked? — is answered “no” here, and the analysis changes accordingly.
Now, let’s shift our focus to two samples from two distinct populations. This scenario arises frequently in many real-world applications where we wish to compare two population means.
Fortunately, under mild conditions, the difference between the two sample means, \(\bar{X}_1 - \bar{X}_2\), is approximately normal. This allows us to extend the statistical procedures we learned for the one-sample case to this new two-sample setting.
Key Insights:
Just as in the one-sample case, we have both \(z\) statistics and \(t\) statistics for two-sample inference.
When the population standard deviations \(\sigma_1\) and \(\sigma_2\) are unknown and unequal, we use the standard two-sample \(t\) procedure.
However, if the two populations are assumed to have equal standard deviations (\(\sigma_1 = \sigma_2\)), we can pool the variance to obtain a more efficient procedure, known as the pooled two-sample \(t\) test.
By leveraging these different approaches, we can increase the accuracy and efficiency of our statistical inference when comparing two population means.
Note
Goals and Setup
Objective: Compare the means of a response variable in two different groups (populations).
Examples:
Comparing college students’ impressions from Wisconsin vs. Indiana.
Testing two different diets and measuring their impact on blood pressure.
Evaluating two incentive plans for debit card usage.
Key Conditions:
Each group is viewed as a distinct population.
We gather independent SRSs: one from each population.
The responses in group 1 are independent from those in group 2.
Notation
Population 1: Mean \(\mu_1\), Standard Deviation \(\sigma_1\), Sample Size \(n_1\), Sample Mean \(\bar{x}_1\), Sample SD \(s_1\).
Population 2: Mean \(\mu_2\), Standard Deviation \(\sigma_2\), Sample Size \(n_2\), Sample Mean \(\bar{x}_2\), Sample SD \(s_2\).
We often compare \(\mu_1\) and \(\mu_2\) by examining the difference \(\mu_1 - \mu_2\). In practice, we estimate this using \(\bar{x}_1 - \bar{x}_2\).
Two-Sample z Statistic (Population SDs Known)
If \(\sigma_1\) and \(\sigma_2\) are known:
The sampling distribution of \((\bar{x}_1 - \bar{x}_2)\) is Normal if both populations are Normal (or \(n_1, n_2\) are large enough by the Central Limit Theorem).
Mean of \((\bar{x}_1 - \bar{x}_2)\) is \((\mu_1 - \mu_2)\).
Variance of \((\bar{x}_1 - \bar{x}_2)\) is \(\frac{\sigma_1^2}{n_1} + \frac{\sigma_2^2}{n_2}\), assuming independence between the two samples.
The two-sample \(z\) statistic is:
When Population SDs Are Unknown: Two-Sample t Procedures
Typically, \(\sigma_1\) and \(\sigma_2\) are unknown in real-world settings.
We replace \(\sigma_1\) and \(\sigma_2\) by their sample estimates \(s_1\) and \(s_2\).
The resulting test or confidence interval is the two-sample t procedure.
As with the one-sample case, if the sample sizes are reasonably large (or if each group is approximately Normal), these t procedures are robust to moderate deviations from Normality.
We’ll derive the exact form of the two-sample t statistic, its degrees of freedom, and how to construct confidence intervals for \(\mu_1 - \mu_2\).
1. When Do We Use Two-Sample t Procedures?
Unknown \(\sigma_1\) and \(\sigma_2\): In real-world settings, population standard deviations are typically unknown.
Two Independent SRSs: We draw samples of sizes \(n_1\) and \(n_2\) from two populations with means \(\mu_1\) and \(\mu_2\), respectively.
Comparison of Means: We want to infer about \(\mu_1 - \mu_2\), either via hypothesis testing (e.g., \(H_0: \mu_1 = \mu_2\)) or a confidence interval (CI) for \(\mu_1 - \mu_2\).
By replacing \(\sigma_1\) and \(\sigma_2\) with their sample estimates (\(s_1\) and \(s_2\)), we obtain a t-based procedure instead of the (rarely used) two-sample \(z\) procedure.
2. The Two-Sample t Statistic
When \(\sigma_1\) and \(\sigma_2\) are unknown, the two-sample t statistic is
We typically test \(H_0: \mu_1 = \mu_2\) (or \(\mu_1 - \mu_2 = 0\)).
Under \(H_0\), \(\mu_1 - \mu_2 = 0\), so the statistic simplifies to
\[t \;=\; \frac{(\bar{x}_1 - \bar{x}_2)}{\sqrt{\frac{s_1^2}{n_1} + \frac{s_2^2}{n_2}}}.\]
Degrees of Freedom (\(k\)):
Exact distribution is complicated.
Software commonly uses the Satterthwaite approximation, which yields a t distribution with \(k\) degrees of freedom (not necessarily an integer).
No software? A conservative approximation is \(k = \min(n_1-1,\; n_2-1)\).
3. Two-Sample t Confidence Interval
A level \(C\) confidence interval for \(\mu_1 - \mu_2\) is:
where \(t^*\) is the critical value from the \(t(k)\) distribution cutting off an area of \(\frac{1 - C}{2}\) in each tail. The degrees of freedom \(k\) is approximated as above.
Assumptions/Conditions:
Independent samples: The two samples must be independent of each other.
Approximate Normality: For small samples, data from each population should be (roughly) Normal. For large \(n_1, n_2\), the t procedures are robust.
4. Summary
Two-sample \(z\) test: Rarely used because it requires known \(\sigma_1\) and \(\sigma_2\).
Two-sample t: Replaces unknown \(\sigma_1, \sigma_2\) with \(s_1, s_2\).
Hypothesis Tests: \(H_0: \mu_1 = \mu_2 \quad \text{vs.}\quad H_a: \mu_1 \neq \mu_2\) (or \(<\), \(>\)).
Confidence Intervals: Estimate \(\mu_1 - \mu_2\) with an interval.
Degrees of Freedom: Usually approximated by software.
These procedures allow you to draw inferences on the difference between two population means, even if you do not know the actual population standard deviations.
1. Hypothesis and Test Statistic
Hypotheses: Typically, we test
\[ H_0: \mu_1 - \mu_2 = \Delta_0 \quad\text{vs.}\quad H_a: \mu_1 - \mu_2 \neq \Delta_0 \quad(\text{or } <, >).\]A common case is \(\Delta_0 = 0\).
Two-Sample t Statistic:
\[t = \frac{(\bar{x}_1 - \bar{x}_2) - \Delta_0} {\sqrt{\frac{s_1^2}{n_1} + \frac{s_2^2}{n_2}}}.\]The degrees of freedom \(\,k\) are approximated (often by software using the Satterthwaite method).
p-Value: We use the t\((k)\) distribution to find the p-value or critical value for the test.
2. Robustness and Sample Size Guidelines
Just as with the one-sample t, these two-sample procedures are generally robust against moderate non-Normality.
Let \(n_1 + n_2 = n_{\text{total}}\).
If \(n_{\text{total}} < 15\), use t tests only if both samples look reasonably Normal (no major skew or outliers).
If \(15 \le n_{\text{total}} < 40\), the t test works well unless you see outliers or strong skewness.
If \(n_{\text{total}} \ge 40\), the t methods are quite robust, even for skewed data.
Equal Sample Sizes are especially recommended for better robustness and more accurate p-values.
3. Practical Tips
Choosing Labels: You can label whichever sample as “population 1” or “population 2.” It often makes the test statistic positive, avoiding confusion about negative values of \(t\).
Important: This is not the same as changing from a two-sided to one-sided test after seeing the data, which would be improper.
Small Samples: With very small \(n_1\) and \(n_2\), we have limited power, and confidence intervals become wide. Even so, if an effect is large, it can still be detected with small samples, but proceed with caution when distributions are unknown or heavily skewed.
1. Key Assumption: Equal Standard Deviations
We assume both populations have the same (but unknown) standard deviation \(\sigma\).
If true, we can combine (or pool) the two sample variances into a single estimate \(s_p^2\) to improve efficiency.
2. The Pooled Variance and t Statistic
Pooled Variance:
Degrees of Freedom: \(\;n_1 + n_2 - 2\).
Pooled Two-Sample t Statistic for testing \(H_0: \mu_1 - \mu_2 = \Delta_0\):
The corresponding confidence interval for \(\mu_1 - \mu_2\) uses the same \(s_p\) and t-distribution with \(n_1 + n_2 - 2\) degrees of freedom.
3. Advantages and Caveats
Advantages:
Higher degrees of freedom than the general (unequal-\(\sigma\)) two-sample t test, which may yield slightly narrower confidence intervals and smaller p-values if the equal-\(\sigma\) assumption holds true.
Risks:
The condition “\(\sigma_1 = \sigma_2\)” can be difficult to verify in practice.
If the population standard deviations differ substantially or the sample sizes are unbalanced, the pooled procedure can be misleading.
In modern practice, the unequal variance (unpooled) t approach is often safer-most software defaults to it (Satterthwaite approximation), unless you explicitly request pooling.
4. Why Use a Pooled Estimator for \(\sigma^2\)?
The formula assigns weights proportional to the degrees of freedom in each sample, emphasizing the larger sample if \(n_1 \neq n_2\).
Benefits:
Higher Degrees of Freedom: The pooled procedure uses \(n_1 + n_2 - 2\) df, often larger than the approximate df from the unequal-variance (Satterthwaite) method.
Efficiency: By combining variance estimates, we can get a more precise measure of the common \(\sigma\) when \(\sigma_1 = \sigma_2\) is truly valid.
Narrower Intervals: Tends to give slightly smaller standard errors (and thus narrower confidence intervals) if the equal-variance assumption holds.
Example: heights at two colleges (two-sample \(t\), start to finish)
Do students at College A and College B differ in average height? We take independent SRSs — there is no way to pair a student at A with a student at B — and find:
College A: \(n_1 = 35\), \(\bar{x}_1 = 68.2\) in, \(s_1 = 3.6\) in
College B: \(n_2 = 40\), \(\bar{x}_2 = 66.9\) in, \(s_2 = 3.9\) in
Hypotheses: \(H_0: \mu_1 = \mu_2\) vs. \(H_a: \mu_1 \neq \mu_2\).
Test statistic:
Degrees of freedom and \(p\)-value: software (Satterthwaite) gives \(k \approx 72.8\) and a two-sided \(p \approx 0.138\). Without software, the conservative choice \(k = \min(35-1,\ 40-1) = 34\) gives \(p \approx 0.143\) — same conclusion either way.
Conclusion: the observed 1.3-inch difference is not statistically significant at \(\alpha = 0.05\). The 95% confidence interval for \(\mu_1 - \mu_2\), \(1.3 \pm 1.993 \times 0.866 = (-0.43,\ 3.03)\) inches, includes 0: the data are consistent with no difference, but also with a difference as large as 3 inches — these samples simply aren’t big enough to pin it down.
Contrast with the shrinkage study: there, a difference of less than half an inch produced \(t \approx 10\); here, a 1.3-inch difference produces only \(t \approx 1.5\). The difference is the design: pairing eliminated person-to-person variation, while independent samples must carry it in the standard error. (Since \(s_1 \approx s_2\) here, the pooled procedure with \(df = 73\) would also be defensible and gives a nearly identical result.)
7.3. Sample Size Calculations#
A question before this section
Your advisor approves the height study and asks one deceptively simple question: “How many students will you measure?” Answer “as many as possible” and you’ll be sent back to your desk — each measurement costs time and money. Measure too few, and your confidence interval comes out uselessly wide; measure too many, and you’ve wasted resources proving what half the sample would have shown. There is a defensible number, and remarkably, you can compute it before collecting a single observation.
For all the statistical procedures we have introduced so far, in addition to the population standard deviation \(\sigma\) and sample standard deviation \(s\), we also see the sample size \(n\) in the formulas.
In theory, the sample size \(n\) is known to researchers, but in practice, when planning a study, choosing the right sample size is an important decision. The goal is to ensure that the margin of error stays below a prespecified value \(m\) at a given confidence level.
Trade-off: Precision vs. Cost
As the sample size increases, the margin of error decreases, improving precision.
However, collecting more data comes with increased time, cost, and effort.
This is why planning ahead is crucial: we need a large enough sample size to achieve the desired margin of error \(m\), but not unnecessarily large to waste resources.
Starting with the Margin of Error Formula
To determine the required sample size, we begin with the formula for the margin of error, which depends on the confidence level and the variability in the population.
Note
1. Margin of Error for a Mean \(\mu\)
A one-sample t confidence interval has the margin of error:
where:
\(n\) is the sample size,
\(t^*\) is the t-critical value for the desired confidence level (depends on \(\text{df} = n - 1\)),
\(s\) is the sample standard deviation after collecting data, but we guess a value \(s_g\) beforehand when planning.
Goal: Choose \(n\) to achieve an expected margin of error \(\le m\).
Since we won’t know the actual \(s\) until we sample, we use our best guess \(s_g\) for calculations.
If previous studies or pilot data are available, we might estimate \(\sigma\) from those results.
In the absence of prior data, subject-matter expertise or known properties of the data can guide us.
A simple rule of thumb:
Justification: For many roughly bell-shaped distributions, the range spans about 4 standard deviations (from roughly \(\mu - 2\sigma\) to \(\mu + 2\sigma\)), so dividing the range by 4 provides a crude estimate of \(\sigma\).
Although not exact, it can be a useful starting point for sample-size or margin-of-error calculations when more precise estimates of \(\sigma\) are unavailable.
Note
2. Iterative Search Approach
Because \(t^*\) itself depends on \(n\), an iterative method is often used:
Initial Approximation:
Replace \(t^*\) with the corresponding z-value (as if \(\sigma\) were known).
Solve
\[ n = \Bigl(\frac{z^*\,s_g}{m}\Bigr)^2\]and round up to the nearest integer.
Refine Using t Distribution:
With the tentative \(n\), find the actual \(t^*\) for confidence level \(C\) and \(\text{df} = n-1\).
Check if \(m \ge t^* \cdot \frac{s_g}{\sqrt{n}}\).
If not met, increment \(n\) and repeat.
This process continues until the requirement \(m \ge t^*\frac{s_g}{\sqrt{n}}\) is satisfied.
Note
3. Two-Sample Case
To design for a two-sample t confidence interval for \(\mu_1 - \mu_2\):
Often assume equal sample sizes \(n_1 = n_2 = n\) and similar standard deviations \(s_1 \approx s_2\).
The margin of error for \(\bar{x}_1 - \bar{x}_2\) becomes
\[ m = t^* \cdot s_g \,\sqrt{\frac{1}{n} + \frac{1}{n}} \;=\; t^*\cdot s_g\sqrt{\frac{2}{n}}.\]We again guess \(s_g\) and use an iterative method (now with \(\text{df} \approx 2(n-1)\)) if we need a more precise approach.
In addition to planning for the sample size \(n\), we often also need to consider the power of our hypothesis test. These two concepts are closely related. Looking at the list of factors that influence power, we see that the first three also impact the margin of error.
Significance Level \(\alpha\)
A 5% test (\(\alpha=0.05\)) is more likely to reject \(H_0\) than a 1% test (\(\alpha=0.01\)) for the same true alternative, simply because less evidence is required to reject \(H_0\).
Population Standard Deviation \(\sigma\)
More variability (larger \(\sigma\)) makes it harder to detect a true difference from \(H_0\).
With less variability, the test statistic is more sensitive to departures from \(H_0\).
Sample Size \(n\)
Larger \(n\) reduces the standard error, making it easier to detect a given difference.
Power increases as \(n\) grows.
The Alternative (Effect Size)
The farther the true parameter is from the null hypothesis value, the easier it is to reject \(H_0\).
We often measure this distance as “effect size” = \(\frac{\text{departure from }H_0}{\sigma}\).
Before collecting data, researchers often choose:
\(\alpha\): The significance level (e.g., 5%).
Minimum Detectable Effect: The smallest departure from \(H_0\) that matters in practice.
Desired Power (e.g., 80% or 90%).
Estimate of \(\sigma\) (or \(\sigma\)s in two-sample scenarios).
Software is typically used to solve for the required sample size \(n\) that achieves the target power for detecting the specified effect size at level \(\alpha\).
Calculating Power
Reject \(H_0\) Region: Determine the critical test statistic(s) that lead to rejection, based on \(\alpha\).
Assume a Specific \(\mu\) (or Effect Size) Under \(H_a\): Find the probability that the test statistic falls in the rejection region, given this alternative is true.
Mathematically, this requires a noncentral t distribution (or other distribution, depending on the test). Manually this is tedious, so we rely on statistical software.
7.4. Putting It All Together: Which \(t\) Procedure?#
Every problem in this chapter reduces to one diagnostic question: how many samples do I have, and are the observations linked? Ask it first, every time:
One column of numbers, one population → one-sample \(t\) (\(df = n - 1\)).
Two measurements per unit (same person twice, same part twice, natural pairs) → matched pairs: subtract within each pair, then run a one-sample \(t\) on the differences (\(df = n_{\text{pairs}} - 1\)).
Two unrelated groups, no link between an observation in one and an observation in the other → two-sample \(t\) (Satterthwaite \(df\) from software, or the conservative \(\min(n_1 - 1, n_2 - 1)\)).
Practice on three mini-scenarios:
Scenario A. Campus dining wants to know whether the mean sodium content of its lunch entrées differs from its 800 mg target. A dietitian samples 20 entrées and measures each once.
One sample of 20 measurements, compared against a fixed benchmark (800 mg) — nothing is linked to anything. One-sample \(t\), \(df = 19\).
Scenario B. Do students type faster after a one-hour keyboard-shortcuts workshop? The same 25 students take a typing test before the workshop and again after.
Two measurements — but per student: each “after” score is linked to its own “before” score. Matched pairs → one-sample \(t\) on the 25 differences, \(df = 24\). (Running a two-sample \(t\) with \(n_1 = n_2 = 25\) would be the misconception from earlier in the chapter.)
Scenario C. Do engineering majors and liberal-arts majors differ in average nightly sleep? Researchers survey 40 engineers and 45 liberal-arts majors.
Two groups of different people with no pairing possible. Two-sample \(t\) with Satterthwaite degrees of freedom.
Now run Scenario B through the four steps. Suppose the differences \(d_i = \text{after}_i - \text{before}_i\) (words per minute) give \(\bar{d} = 6.8\) and \(s_d = 9.5\).
Step 1 — State. Let \(\mu_d\) be the population mean change in typing speed. \(H_0: \mu_d = 0\) vs. \(H_a: \mu_d > 0\) (one-sided, chosen before the data: the workshop is intended to help). Use \(\alpha = 0.05\).
Step 2 — Plan and check conditions. Paired design → one-sample \(t\) on the differences, \(n = 25\), \(df = 24\). With \(15 \le n < 40\), the robustness guidelines say to check the histogram of the 25 differences for strong skew or outliers; suppose it looks unremarkable.
Step 3 — Solve.
Step 4 — Conclude. \(p \approx 0.0008 < 0.05\): strong evidence that mean typing speed increased after the workshop. The 95% confidence interval, \(6.8 \pm 2.064 \times 1.9 = (2.9,\ 10.7)\) wpm, estimates the size of the gain. One design caution from Chapter 3 still applies: with no control group, a practice effect (taking the test twice) is confounded with the workshop itself — a cross-over design with a control activity would separate them.
7.5. Check Your Understanding#
1. A researcher with \(n = 500\) observations says: “My sample is large, so I’ll use \(z\) with \(s\) in place of \(\sigma\).” What’s the principled objection — and does it matter numerically?
The principled rule: \(\sigma\) is unknown and estimated by \(s\), so the correct procedure is \(t\) with 499 degrees of freedom — a large \(n\) is not what justifies \(z\); a known \(\sigma\) would be. Numerically it barely matters here (\(t^*_{499} = 1.965\) vs. \(z^* = 1.960\) for 95% confidence), which is exactly why the shortcut survives — but “use \(t\) whenever \(\sigma\) is estimated” is the rule that is always correct, at every sample size.
2. Each of 18 vineyards is measured by two different soil-moisture sensors (both sensors used at every vineyard). The analyst runs a two-sample \(t\) with \(n_1 = n_2 = 18\). What went wrong, and what would it cost?
The data are paired — the two readings at each vineyard share that vineyard’s soil, weather, and slope. The correct analysis subtracts within each vineyard and runs a one-sample \(t\) on 18 differences (\(df = 17\)). The two-sample formula treats the samples as independent, so its standard error wrongly includes vineyard-to-vineyard variation; the SE is inflated, \(t\) shrinks, and a real sensor discrepancy can be masked entirely — just as the shrinkage example collapsed from \(t \approx 10\) to \(t \approx 0.5\) under the wrong analysis.
3. A generic drug must be shown “equivalent” to the brand within \(\delta = 0.20\). The study reports a standard test of \(H_0\): difference \(= 0\) with \(p = 0.45\), and a 90% confidence interval for the difference of \((-0.08,\ 0.15)\). Which fact establishes equivalence?
The confidence interval does. \((-0.08,\ 0.15)\) lies entirely inside the equivalence zone \((-0.20,\ 0.20)\), so the TOST criterion is met at the 5% level: any true difference is demonstrably too small to matter. The \(p = 0.45\) by itself establishes nothing — failing to reject \(H_0\) could equally reflect a small, noisy study. (Note the reversal: here the interval, not a small \(p\)-value against zero, is the evidence.)
7.6. Properties of \(s^2\) and \(s\): Unbiasedness and Consistency#
Let \(X_1, X_2, \ldots, X_n\) be i.i.d. random variables with mean \(\mu\) and variance \(\sigma^2\).
Define the sample variance:
Key Result: \(\mathbb{E}[s^2] = \sigma^2\).
Here’s the sketch of the proof:
One can expand \((X_i - \bar{X})^2\) into \(\Bigl[(X_i - \mu) - (\bar{X} - \mu)\Bigr]^2\) and use the fact that
Taking expectations and using \(\mathbb{E}[(\bar{X} - \mu)^2] = \frac{\sigma^2}{n}\) yields
Hence,
Therefore, \(s^2\) is an unbiased estimator of \(\sigma^2\).
To show consistency, we want:
Consistency of \(s^2\)
By the Strong Law of Large Numbers,
\[\frac{1}{n}\sum_{i=1}^n (X_i - \mu)^2 \;\to\; \sigma^2 \quad\text{almost surely.}\]Observe that
\[s^2 = \frac{n}{n-1} \cdot \frac{1}{n}\sum_{i=1}^n (X_i - \bar{X})^2 \approx \frac{n}{n-1} \cdot \frac{1}{n}\sum_{i=1}^n (X_i - \mu)^2,\]where the second step uses \(\bar{X} \approx \mu\) for large \(n\).
Since \(\frac{n}{n-1} \to 1\) and \(\frac{1}{n}\sum_{i=1}^n (X_i - \mu)^2 \to \sigma^2\), it follows that \(s^2 \to \sigma^2\) in probability (or almost surely under mild conditions). Thus, \(s^2\) is a consistent estimator of \(\sigma^2\).
Consistency of \(s\)
By the Continuous Mapping Theorem, if \(s^2 \xrightarrow{\;p\;} \sigma^2\) and the square-root function \(\sqrt{\cdot}\) is continuous for \(\sigma^2>0\), then
\[s = \sqrt{s^2} \;\xrightarrow{\;p\;} \sqrt{\sigma^2} = \sigma.\]Hence, \(s\) is a consistent estimator of \(\sigma\).